
Angular patios (rectangles, squares, L-shapes) suit homeowners who want space efficiency and a clean match to their home’s straight architectural lines. Rounded patios (circles, ovals, gentle curves) work best when you want a soft focal point, like a firepit or circular dining area. Free-form patios fit irregular lots, mature trees, or a naturalistic landscape where straight edges would fight the site instead of working with it.
What to Know
A 20 by 20 foot paver patio typically costs $4,000 to $14,000 installed; curves and custom edges raise labor through extra cutting.
Measure furniture first, then allow 3 to 4 feet for walking paths; a dining area for six needs at least 12 by 12 feet.
Use a compacted gravel base 4 to 6 inches deep and slope the patio surface 1 to 2% away from the house to protect its foundation.
Check local permit rules before construction: patios built at ground level may be exempt, while elevated designs, stairs, and attached covers commonly require plans.
Table of Contents
-
Comparing angular, rounded, and free-form patios at a glance
-
Free-form patios: when to choose them and how to keep them functional
-
Materials, cost hints, and how shape changes installed price
-
Accessibility, circulation, and furniture-first layout rules
-
Permits, site preparation, and drainage considerations that affect shape choice
-
How Fernandez & Sons helps homeowners choose and build the right patio shape
-
Lighting and electrical planning for commercial patio spaces
-
Seasonal adaptability of patio shapes for commercial properties
-
Integrating patio shape with commercial property aesthetics and branding
-
Durability and maintenance needs across commercial patio shapes
Comparing angular, rounded, and free-form patios at a glance
Each shape family carries a distinct visual effect, a best-fit use case, and a different cost and labor profile. Angular shapes read as formal and structured, rounded shapes feel soft and inviting, and free-form layouts look organic, almost like they grew out of the landscape. According to landscape design guidance from the University of Florida IFAS Extension, patio shapes typically fall into these three categories, and designers recommend matching the shape to your home’s architectural lines and your site’s geometry.
-
Angular patios suit dining areas, grilling stations, and yards where straight sightlines already dominate the architecture.
-
Rounded patios work well around a centralized firepit or a circular dining table where conversation flows in every direction.
-
Free-form patios accommodate multi-zone gardens, naturalistic plantings, and sites with trees or slopes that resist straight lines.
Cost and complexity rise as the shape moves away from straight lines. Rectangles and squares are the cheapest to build because large-format slabs and pavers lay down with minimal cutting. Curves and free-form perimeters raise labor and cutting time, since installers must notch or trim material to follow the edge, a point confirmed by Angi’s patio installation cost guide.
A quick sizing rule helps before you commit to any shape: measure your furniture footprint first, then add walking clearance of at least 3 to 4 feet around every seating zone. A dining set for six typically needs a 12 by 12 foot area at minimum, while a lounge arrangement with a sectional and a firepit often needs closer to 16 by 18 feet. Once you know your footprint, you can test whether angular, rounded, or free-form geometry actually fits the space you have.
Angular patios: layout, materials, and cost-saving choices
Angular shapes work because they mirror the straight lines already present in most homes, from foundation walls to fence lines and property boundaries. A rectangular or square patio set against the back of a house reads as an extension of the architecture rather than an afterthought, and an L-shaped layout lets you separate a dining zone from a lounge zone without adding a second structure.
Sizing an angular patio starts with the same furniture-first approach that applies to every shape. Oklahoma State University Extension’s guidance on outdoor rooms recommends a roughly 2:3 ratio for gathering spaces, which keeps a rectangle from feeling like a narrow hallway or an oversized slab with no sense of enclosure. A 14 by 21 foot patio, for example, holds that ratio and comfortably fits a dining set plus a separate seating area.
To get the most value from an angular design:
-
Start with your furniture footprint. Measure your dining table, grill station, and any lounge seating before you draw the patio outline.
-
Apply the 2:3 ratio. Keep width and length proportional so the space feels balanced rather than cramped or cavernous.
-
Choose large-format slabs or a running bond paver pattern. Fewer cuts mean lower labor costs and a cleaner finished look.
-
Plan edge restraint and base compaction from day one. A compacted gravel base and a solid edge restraint keep pavers from shifting or settling unevenly over time.
-
Align the patio with an existing wall or fence line. This reduces the amount of layout guesswork and keeps sightlines clean.
Large-format pavers or poured concrete slabs minimize the number of cuts needed to fill a rectangular footprint, which keeps both material waste and labor hours down. A running bond pattern, where each row of pavers is offset from the one below it, also reduces the need for specialty cuts at the edges compared to more intricate herringbone or basketweave patterns.
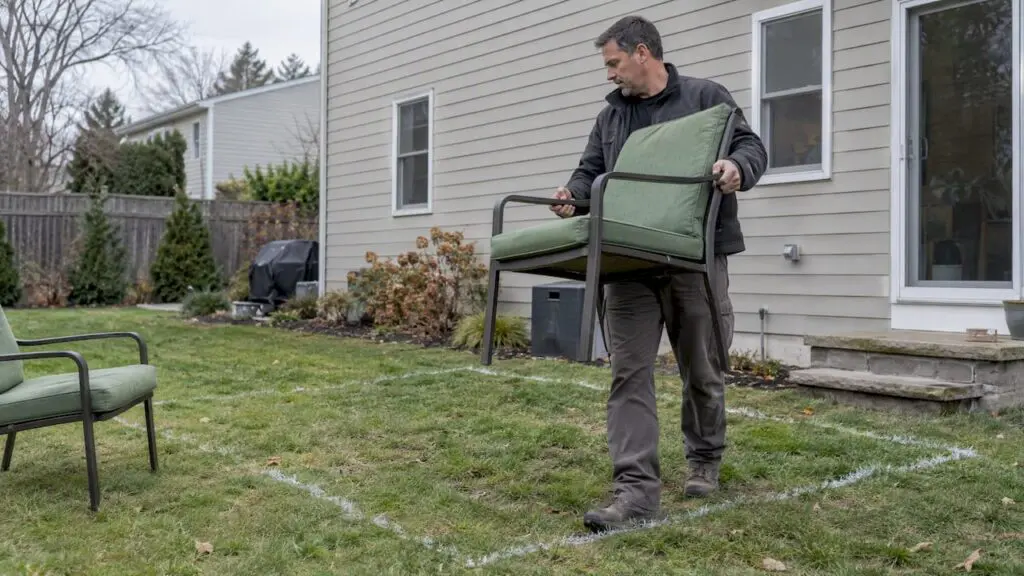
Pro Tip: Before ordering materials, chalk out your proposed patio footprint directly on the lawn or existing patch of dirt. Walk through it with a chair in hand to confirm the dimensions feel right before you commit to an order.
Base preparation matters as much as the shape itself. A properly compacted gravel base, typically 4 to 6 inches deep, combined with a locked-in edge restraint, prevents the kind of heaving and shifting that shortens the life of an otherwise well-designed patio.
Rounded patios: designing focal spots that work
Rounded shapes earn their popularity because they create a natural gathering point. A circular patio built around a firepit puts every seat at an equal distance from the flame, and a curved patio edge softens the transition between hardscape and lawn in a way that straight lines simply cannot.
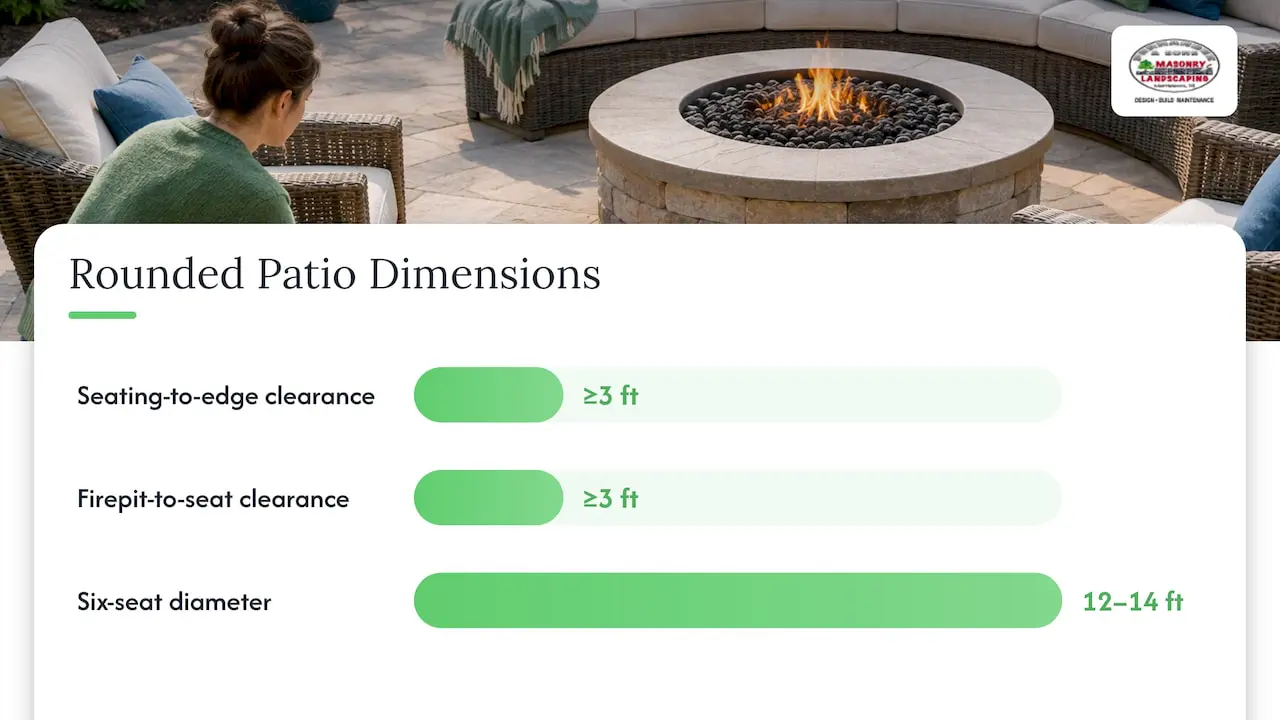
Furnishing a round or oval patio takes a slightly different approach than furnishing a rectangle. Circular footprints work best with furniture arranged in a ring or a loose arc rather than lined up against a wall, and you need enough radius to leave a walking clearance of at least 3 feet between the outer edge of any seating and the patio’s perimeter. A circular patio built around a firepit typically needs at minimum 12 to 14 feet of diameter to seat six people comfortably with room to walk behind the chairs.
-
Size the circle to the activity. A firepit gathering area needs less diameter than a full dining layout, so decide the primary use before finalizing dimensions.
-
Leave a buffer around the firepit itself. Most manufacturers recommend at least 3 feet of clearance between a firepit and any seating.
-
Use pavers or small-format stone rather than large slabs. Smaller units bend around a curve with far less custom cutting.
-
Blend the curved edge into the lawn with a steel or paver edge restraint. This keeps grass from creeping into joints while preserving the soft visual line.
Pavers and small-format natural stone are the practical choice for rounded designs because they can follow a curve without the extensive custom fabrication that large slabs require. Angi’s cost guidance notes that pavers are commonly recommended for curved or circular patios specifically because they accommodate curves with less custom cutting than poured concrete or large-format stone, which still helps control labor costs even though any curve adds some cutting compared to a straight-edged design.
Pro Tip: If you are building around a firepit, lay out your seating with the actual furniture pieces before finalizing the patio diameter. It is far easier to adjust a layout on paper than to discover afterward that chairs do not fit comfortably around the flame.
Free-form patios: when to choose them and how to keep them functional
Free-form patios make the most sense when your site already has organic features that would fight against a straight-edged design: mature trees with irregular root zones, a sloped or naturally curving lot line, or a landscape style built around naturalistic plantings rather than formal rows. In these situations, a free-form perimeter lets the patio follow the land instead of forcing the land to follow a straight edge.
Planning circulation is the biggest challenge with free-form shapes, since an irregular perimeter can easily turn into a series of long, narrow strips if you are not deliberate about zoning. Instead, break the space into distinct pockets, a dining nook here, a lounge area there, connected by paths wide enough for two people to walk comfortably side by side.
-
Define each zone before you draw the outline. A free-form patio works best as a series of connected spaces rather than one undifferentiated shape.
-
Avoid long, narrow extensions. These create awkward furniture placement and wasted walking space.
-
Choose flagstone or irregular pavers for the edges. These materials are designed to follow organic lines without forcing uniform cuts.
-
Use polymeric sand or tightly fitted joints to control weeds. Irregular joints are more prone to weed intrusion than uniform paver joints, so joint material matters more here than in a rectangular design.
-
Add a consistent border band around the perimeter. A single row of uniform pavers or a poured concrete band along the outer edge limits how much of the organic material needs custom cutting, which keeps waste down.
Flagstone is the traditional choice for free-form patios because each piece is naturally irregular, so the material does not need to be forced into a shape it was not made for. Irregular pavers designed specifically for curved and organic layouts offer a similar benefit with slightly more uniform thickness, which can simplify installation.
Materials, cost hints, and how shape changes installed price
Material choice and shape together determine most of what you will pay for a finished patio. A professionally installed 20 by 20 foot paver patio commonly falls between $4,000 and $14,000 installed, according to a detailed cost breakdown from DG Floors, with material choice and site conditions as the main drivers of where a project lands within that range.
That range widens or narrows depending on shape. A simple rectangle or square tends to land toward the lower end of that band because large-format material lays down with minimal cutting. Curved and custom free-form shapes push costs higher because Angi’s cost research confirms that any shape beyond a basic rectangle or square typically increases installation costs, since curves and custom perimeters require more labor and more cutting than a straight-edged design.
A few practical choices help control costs regardless of which shape you choose:
-
Favor straight borders where the design allows it, even on a curved patio, since a straight outer band reduces the total amount of custom cutting.
-
Choose a common running bond field pattern rather than herringbone or basketweave, which require more precise cuts and more installation time.
-
Ask about end-of-season material inventory. Suppliers sometimes discount remaining stock of pavers or stone as the building season winds down.
-
Get multiple quotes that itemize labor versus material. This makes it easier to see exactly where your shape choice is adding cost.
A 20×20 patio is a useful benchmark for comparison shopping. Professional installation of that footprint commonly runs $4,000 to $14,000, which gives homeowners a real-world reference point when a contractor quote comes in higher or lower than expected.
Certain site conditions make hiring a contractor strongly advisable rather than optional. Limited equipment access, poor drainage, or a patio that needs to be raised or tied into a retaining wall all introduce structural and grading questions that go well beyond laying pavers on a flat base. These conditions are also where permit and inspection requirements are most likely to apply, which makes professional guidance worth the added cost.
Accessibility, circulation, and furniture-first layout rules
The single most useful planning step for any patio shape is measuring your furniture footprint before you draw a single line. Once you know how much space your dining set, lounge seating, or outdoor kitchen actually requires, you can test whether angular, rounded, or free-form geometry fits your yard rather than guessing and adjusting later.
-
Measure every furniture piece you plan to use, including chairs pulled out from the table, and add that total to your footprint calculation.
-
Plan clear walking paths of at least 3 to 4 feet around and between seating areas, which universal design guidance from Oregon State University Extension identifies as the width needed for comfortable, accessible circulation.
-
Favor a roughly 2:3 ratio for any single gathering zone, avoiding long, narrow rectangles that waste space on one axis while feeling cramped on the other.
-
Test your layout on-site before committing. Mississippi State University Extension recommends laying a garden hose along your proposed patio outline, which lets you walk the space, check sightlines, and spot obstructions faster than redrawing a plan on paper.
-
Choose smooth, hard-paved surfaces for primary walkways, which keeps the space usable for strollers, wheelchairs, and anyone with mobility limitations.
Pro Tip: Run the hose test with your actual outdoor furniture staged nearby. Standing in the proposed space with a chair in hand reveals scale problems that a flat yard outline never shows.
Our patio size guide walks through specific dimension recommendations for common furniture arrangements, which can help you translate these general rules into exact measurements for your yard.
Permits, site preparation, and drainage considerations that affect shape choice
Whether your patio needs a permit depends heavily on local rules, and that answer can shape which design options are realistic. Prince George’s County’s permitting office notes that patios at grade may fall under permit-exempt size thresholds, while elevated patios, added stairs, or attached covers commonly trigger permitting and plan submittal requirements. Checking with your local building department before finalizing a shape avoids costly redesigns later.
Site preparation essentials apply no matter which shape you choose. A compacted base and a slope of roughly 1 to 2% away from the house keep water moving away from your foundation rather than pooling against it. Underground utilities, mature trees, and property setback rules can all narrow your shape options, since a free-form curve designed around a tree’s root zone looks very different from a straight edge dictated by a setback line.
Before requesting a quote, gather a few documents:
-
A plat of survey showing your property lines and existing structures.
-
Door and window locations along the house wall where the patio will connect.
-
Site photos showing slope, drainage patterns, and any trees or utility access points nearby.
Our guide to patio permits covers the permitting steps and considerations that typically apply to patio projects, which is worth reviewing alongside your local building department’s own requirements.
How Fernandez & Sons helps homeowners choose and build the right patio shape
We handle the full process from design through installation: choosing a shape that fits your site, assisting with permit questions, selecting materials that match your budget, and completing the build with a focus on lasting craftsmanship. Every project comes with an estimate and a satisfaction guarantee. Our landscaping and design services page outlines how we approach patio projects from the first conversation through final installation, and our paver patio project gallery shows completed examples across different shapes and materials.
Lighting and electrical planning for commercial patio spaces
Commercial patios carry lighting needs that go beyond what a backyard requires, since outdoor dining and gathering areas at restaurants, offices, and retail properties need to stay usable after dark while meeting code requirements for exterior electrical work. The shape of the patio directly affects how lighting gets planned: an angular patio allows for straightforward perimeter lighting along straight edges, while a rounded or free-form patio often calls for a ring of fixtures or embedded path lights that follow the curve.
String lighting, post-mounted fixtures, and low-voltage path lighting are common choices for commercial outdoor spaces because they create usable light without the visual bulk of taller fixtures. Planning electrical runs during the design phase, rather than after the patio is built, keeps conduit paths clean and avoids cutting into finished hardscape later. For a space meant to double as a dining or entertaining area after sunset, ambiance matters as much as basic visibility. Lights & Things offers practical guidance on designing lighting ambiance for entertaining spaces, which applies directly to commercial patios that need to feel inviting into the evening hours.
Any electrical work tied to a commercial patio, including outlets for seasonal lighting or outdoor equipment, should be installed by a licensed electrician and should factor into the same permitting conversation as the patio structure itself, since combining structural and electrical plan submittals upfront tends to move projects along faster.
Seasonal adaptability of patio shapes for commercial properties
Commercial properties in our region deal with a full range of seasonal conditions, from summer heat that drives outdoor dining demand to winter snow and ice that shut hardscape areas down entirely if they are not planned with drainage and maintenance in mind. Shape plays a real role here. An angular patio with straight edges is generally easier to plow or shovel efficiently, since equipment can run clean, straight passes without working around curves. A rounded or free-form patio, while attractive, often needs more hand-clearing around curved edges and tighter corners.
Drainage becomes especially important heading into winter, since water that pools on a patio surface during a fall rain can refreeze into ice patches that create liability concerns for a commercial property. A consistent slope away from the building, paired with a base that was properly compacted during installation, reduces how much standing water accumulates in the first place.
For properties that rely on a patio space for three-season or year-round use, material choice also affects seasonal performance. Pavers tend to handle freeze-thaw cycles well when installed over a properly compacted base, while poured concrete without adequate control joints can be more prone to cracking in our climate’s temperature swings. We also handle commercial snow plowing for properties that need patio and walkway areas cleared consistently through the winter months.
Integrating patio shape with commercial property aesthetics and branding
A commercial patio is often the first outdoor impression a customer or client forms of a property, which means the shape you choose should reinforce the look and feel the business is going for rather than working against it. A restaurant aiming for a polished, modern image typically benefits from the clean lines of an angular patio that echoes the building’s architecture. A property built around a more relaxed, garden-style atmosphere, such as a boutique hotel or wellness center, often pairs better with rounded or free-form shapes that soften the hardscape and blend into surrounding plantings.
Material and color choices extend that branding further. A patio built from pavers or stone in tones that complement the building’s exterior creates visual continuity between indoor and outdoor spaces, which matters for properties that use outdoor seating as an extension of their dining room or lobby. Consistent material choices across a property’s walkways, patio, and entry areas also reinforce a cohesive look rather than a patchwork of mismatched surfaces added over time.
Our guide to hardscaping updates that increase curb appeal covers additional ways that material and design choices shape how a property reads to visitors, which applies to commercial settings as much as residential ones.
Durability and maintenance needs across commercial patio shapes
Commercial patios see heavier foot traffic than a typical residential backyard, which makes durability and ease of maintenance central to the shape and material decision. Angular patios built with large-format pavers or poured concrete slabs tend to be the most straightforward to maintain, since fewer joints and a simpler perimeter mean less area where weeds, debris, or water can collect. Rounded and free-form patios, with their higher proportion of cut pieces and irregular joints, often require more frequent joint maintenance to prevent weed growth and joint sand erosion.
Regular cleaning plays a direct role in how long any paved surface holds up, particularly for commercial properties where spilled food, drink, and heavy foot traffic accelerate wear. Capital Pro Pressure Washing’s guidance on cleaning a brick patio without damaging the surface is a useful reference for property managers setting up a maintenance routine, since improper cleaning methods can wear down joint sand or damage paver surfaces faster than normal use would.
Sealing pavers or stone every few years helps protect against staining and freeze-thaw damage, which matters more in commercial settings where a patio needs to stay presentable year-round rather than just during peak season. Choosing a shape with fewer custom cuts and simpler joints at the outset reduces how much ongoing maintenance a property will need to budget for over the life of the patio.
Balancing form and function in patio design
Design to furniture footprints first, always. A striking shape that cannot fit a dining set or leave room to walk around a firepit fails at its basic job. Scale and a sense of enclosure matter more than novelty, no matter which shape you pick.
— BG
Ready to build your patio? Here’s how we help
Choosing between angular, rounded, and free-form is only the first step. Turning that choice into a finished patio means handling site grading, material selection, permit questions, and installation details that affect how the space performs for years. We manage all of it, from initial design through the final paver.

-
Design consultation that matches your chosen shape to your site, your budget, and the way you actually plan to use the space.
-
Permit assistance so elevation changes, attached structures, or drainage questions get resolved before construction starts.
-
Material selection from pavers to natural stone, matched to your shape and your long-term maintenance preferences.
-
Installation backed by our satisfaction guarantee, with a free estimate to start the conversation at no cost.
If you are ready to move from planning to building, request a free estimate through our landscaping and design services page and we will help you turn your chosen shape into a patio you will use for years.
FAQ
What are the different types of patios available?
Patios generally fall into three shape families: angular (rectangles, squares, L-shapes), rounded (circles, ovals, gentle curves), and free-form (irregular, organic perimeters), according to landscape design guidance from the University of Florida IFAS Extension. Material choices, such as pavers, poured concrete, natural stone, or gravel, apply across all three shape families and further distinguish one patio design from another.
How much should a 20×20 patio cost?
A professionally installed 20 by 20 foot paver patio commonly ranges from $4,000 to $14,000, according to a cost breakdown from DG Floors. Material choice, site conditions, and how much cutting the shape requires are the main factors that determine where a project lands within that range.
How do I set up a small patio?
Start by measuring your furniture footprint, including dining chairs pulled out from the table, and add clearance of at least 3 to 4 feet for walking paths around the seating. A simple rectangular or square shape makes the most efficient use of a small footprint since it requires minimal cutting and leaves less wasted space than a curved or free-form design.
What is the structure called that goes over a patio?
A roofed or slatted structure built over a patio is commonly called a patio cover, and many attached versions require plan submittal and structural calculations when they go beyond a standard design. Building-department guidance from Rialto, California outlines typical technical requirements like post spacing and footing sizes that apply to these structures, though exact rules vary by local jurisdiction.
Do I need a permit to build a patio?
Permit requirements depend on your patio’s elevation, whether it includes stairs, and whether it connects to an attached structure like a cover. Prince George’s County’s permitting office notes that at-grade patios may be permit-exempt under certain size thresholds, while elevated designs commonly require plan submittal, so checking with your local building department before construction is worth the time.
Sources
-
Creating outdoor rooms | Oklahoma State University Extension
-
Patio permit guidance | Prince George’s County permitting office