
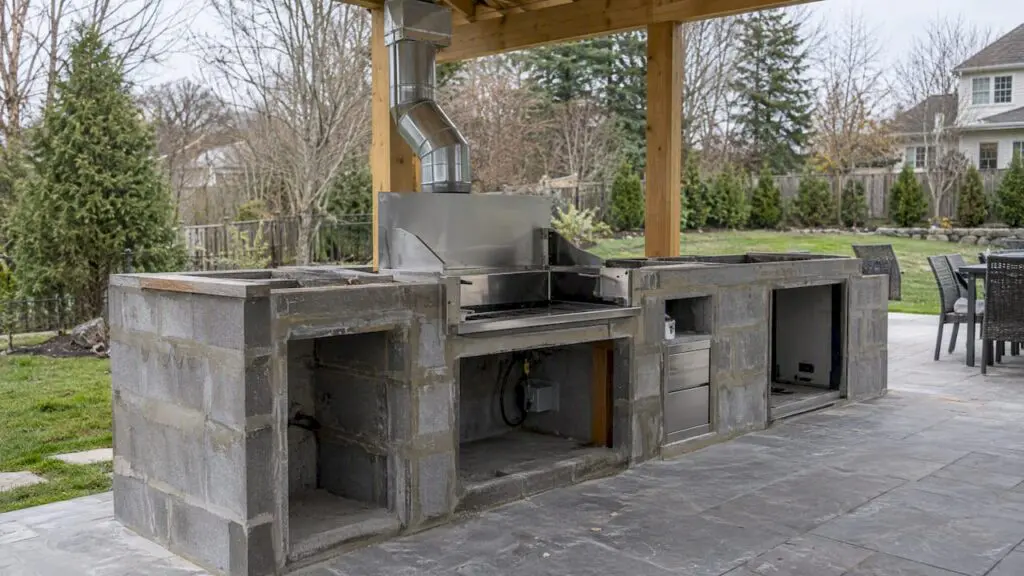
If your outdoor kitchen has a grill, griddle, or fryer under a cover or built into an island, plan a vent hood or dedicated island venting from day one. Grease, carbon monoxide, and trapped propane are the main concerns, and CPSC guidance backs that up. Your first step: read each appliance’s installation instructions, then sketch the shortest duct run.
TL;DR:
- A covered cooking area, multiple burners, a griddle, fryer, or nearby seating favors an exhausted hood; an open single grill may need only cabinet vents.
- For a residential grill, plan roughly 200 to 500 cfm of installed airflow; larger commercial grills need more, while oversized fans can disrupt flames.
- Use a wider hood and short, straight rigid metal or smooth wall aluminum duct, sealing joints with UL listed materials.
- Island vents protect against gas buildup: place propane openings low and natural gas openings high, while following appliance instructions for the enclosure.
- CPSC recommends keeping freestanding grills at least 10 feet from homes and structures; installed outdoor kitchens follow appliance clearances and local codes instead.
Table of Contents
- Do you need an outdoor vent hood?
- How to size a hood and pick the right CFM
- Hood placement, mounting height, and clearances
- Island venting and cabinet ventilation
- Ducting and exterior termination
- Safety, codes, and a maintenance schedule
- Why we plan ventilation before the first stone is set
- Let us design and install your outdoor kitchen ventilation
- FAQ
- Sources
Do you need an outdoor vent hood?
Short answer: it depends on what you cook on and where you cook. A grill in the open yard, far from walls and overhangs, can run without any exhaust hardware. The picture changes the moment you add a roof, a pergola, or a built-in island.
Grease-producing appliances such as grills, griddles, and fryers are the ones that push you toward a hood. In commercial kitchens, model mechanical codes and NFPA 96 define hood types (Type I for grease-laden vapors, Type II for heat and steam) and when listed equipment is required, as UL Solutions explains. Residential outdoor kitchens are not held to the same rules in most cases, but those categories are a useful guide to how seriously grease should be treated.
The appliance manufacturer’s installation instructions and your local authority having jurisdiction settle the final answer. The appliance manufacturer’s installation instructions come first, and your local authority having jurisdiction (usually the building or fire official) has the last word. Check both before you buy a hood or frame an island.
Here is how we sort the common situations:
- Hood recommended: the cooking area sits under a roof, pergola, or other cover where smoke and grease can collect.
- Hood recommended: the island holds multiple burners, a griddle, or a fryer, since these generate more grease and heat.
- Hood recommended: the layout puts seating or a wall close behind the cooking line.
- Passive vents can be enough: a single grill sits on an open-air island with no overhead structure, and the manufacturer calls only for cabinet venting.
- Always required: any vents or clearances the appliance manual specifies, no matter how open the space feels.
One point worth repeating: cabinet vents are not a substitute for an exhausted hood. They let gas escape and heat dissipate from inside the island, but they do nothing to capture grease and smoke above the cooking surface.
If you are still deciding on layout, our outdoor kitchen layout guide shows where a hood and duct run fit into the plan before any stone is set.
How to size a hood and pick the right CFM
CFM (cubic feet per minute) tells you how much air a fan moves. What you actually care about is capture efficiency: how much of the smoke and grease rising off the cooktop the hood pulls in before it escapes. Higher airflow generally improves capture, and it is the installed airflow that counts, not the number printed on the box. A DOE presentation on kitchen ventilation notes that installed airflows often fall short of advertised performance because of duct losses and poor routing.
Roughly 200 cfm is a meaningful capture threshold, with DOE analysis showing materially better capture at that level than at about 100 cfm for burners. For you, that means a weak fan paired with a long duct can look fine on paper and still let smoke slip past.
Here are rule-of-thumb ranges we use when talking with homeowners. They are planning guides, not code requirements, so confirm against your hood and appliance documentation:
- Light-duty residential grill: roughly 200 to 500 cfm of installed airflow, depending on how often and how hard you cook.
- Multi-burner setups with a griddle or side burner: toward the upper end of that range, and sometimes beyond.
- Large or commercial-style grills: often substantially more airflow, which usually means a commercial-capacity fan.
Bigger is not automatically better. A powerful fan costs more to buy and run, makes more noise, and needs a larger duct to avoid choking itself. It can also pull the flame sideways on a gas grill if the hood is too aggressive for the burner setup, so match the fan to the appliance rather than buying the biggest unit on the shelf.
A few habits protect the airflow you pay for:
- Choose a hood that is wider than the cooking surface so smoke has room to rise into it.
- Keep the duct short and straight, and use the diameter the hood manufacturer specifies or larger.
- Ask for the fan’s performance at the static pressure of your actual duct run, not just free-air CFM.
- Place the fan where you can reach it for cleaning.
Planning the duct run alongside the layout is the cheapest way to avoid underperforming exhaust. If you are budgeting for it, a partner’s breakdown of ductwork cost per linear foot shows why every extra foot of duct adds both expense and airflow loss.
Hood placement, mounting height, and clearances
Mounting height is a balancing act. Too low, and heat, flare-ups, and the hood itself become hazards. Too high, and smoke drifts past before the fan can capture it. Mounting height depends on the appliance and hood. Follow their installation instructions for the required height.
Fuel type and cooking style shift the sweet spot. Searing and flare-ups from a grill produce rising plumes that benefit from a hood set toward the higher end of the range, while a low-profile griddle may capture well a bit lower. Wind changes things too, which we cover in the weather section below.
Covered structures need extra attention. A hood does not make a combustible ceiling safe. CPSC summer grilling guidance says to use grills only in well-ventilated areas and never under surfaces that can burn, so check the required clearance from the grill and hood to any wood beams, ceilings, and overhangs.
On the exhaust side, a hood that captures grease-laden vapor must be ducted to the exterior. Recirculating (ductless) models filter and return air, which is not a substitute for exhausting grease and combustion byproducts away from the cooking space.
Run through this checklist before you finalize placement:
- Confirm the appliance’s required clearances to combustibles, and the hood’s required height above the cooking surface.
- Check overhead obstructions: beams, lights, fans, and roof framing that could block the hood or duct path.
- Measure the distance from the hood to the roof or wall where the duct will exit.
- Keep the cooking line away from doors, windows, and fresh-air intakes.
- Verify that wind-facing sides are protected so crosswinds do not pull smoke and flame off course.
- Coordinate hood width and position with island dimensions and countertop overhangs.
Decisions about the hood, vents, and cladding fit best when they are made together. Our outdoor kitchen cladding guide helps you pick noncombustible finishes near the cooking surface.
Island venting and cabinet ventilation
An island is a semi-enclosed box, and a box that holds gas fittings needs to breathe. Cabinet vents let leaked gas escape and heat dissipate so neither builds up inside the enclosure. The risk is real: in a CPSC recall of Paradise Grills outdoor kitchens, LP gas could accumulate, and the remedy involved installing a stainless-steel vent.
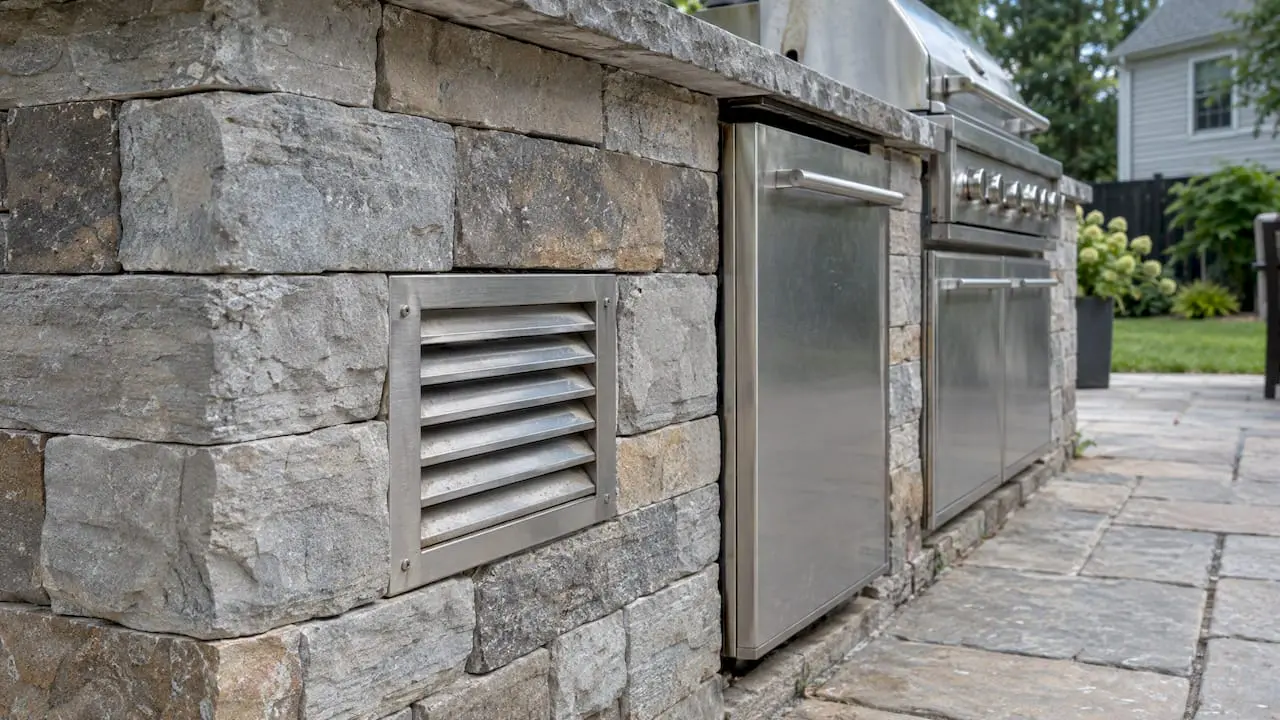
Brand instructions vary, but a pattern shows up often. Vent requirements vary by manufacturer and island design, so follow the instructions for your specific grill and enclosure. Treat that as a starting point and defer to the instructions for your specific grill and enclosure.
Fuel type changes where vents belong:
- Propane (LP): heavier than air, so it settles low. Vents go near the bottom of the cabinet so leaked gas can flow out.
- Natural gas: lighter than air, so it rises. Vents go higher on the enclosure.
Some layouts use both low and high vents to cover heat as well as gas, which is why the grill manual matters more than any rule of thumb.
Practical layout tips we follow on island builds:
- Place vents on opposite sides to encourage cross-flow through the cabinet.
- Keep vent openings clear of drawers, doors, and storage that could block them.
- Leave room for the grill’s restraint system and for service access to fittings and shutoff valves.
- Pick vent covers that suit your finish, whether stainless, stone-faced, or painted.
- Decide on vent size and location before the cladding goes on, so you are not cutting into finished stone.
For design inspiration that blends vents into the overall look, browse our Basking Ridge outdoor kitchen design ideas.
Ducting and exterior termination
Even the best fan underperforms on a bad duct. Every bend, every foot, and every rough surface costs airflow, so the goal is a duct that is short, straight, and smooth. DOE job-aid guidance recommends exactly that: short, straight, smooth rigid runs to the exterior through a roof or sidewall.
Seal duct connections with UL 181B or 181B-M listed materials and insulate ducts that pass through unconditioned space to at least R-8. For you, that means no ordinary household duct tape on the joints, and no bare metal run through an attic or soffit.
Here is the order we work through on a duct run:
- Choose the material. Rigid metal or smooth-wall aluminum is preferred. Avoid corrugated, plastic, or flexible duct, which traps grease and chokes airflow.
- Plan the route. Draw the shortest, straightest path from hood to exterior, and count the elbows. Each bend can reduce airflow, so keep elbows to a minimum and follow the manufacturer’s duct-routing instructions.
- Size the duct. Match or exceed the hood outlet diameter to keep static pressure low. Undersized duct is one of the most common reasons a fan underdelivers.
- Support the run. Hang duct per the instructions, avoid obstructions, and make sure connectors and fasteners do not intrude into the duct interior, as DOE Job Aid 18-2 advises.
- Seal every joint. Use UL 181B or 181B-M listed tape or mastic, not general-purpose tape.
- Insulate where needed. Wrap any duct passing through unconditioned space to at least R-8 to limit condensation and heat loss.
- Terminate to the outside. Pick an exterior termination that matches the duct size and keeps out rain, birds, and pests, and keep it clear of windows and air intakes.
Grease-duct specifics, including listed hoods and special duct construction, are driven by code. UL Solutions points to NFPA 96 and model mechanical codes for commercial-style systems, so if your outdoor kitchen uses commercial-grade equipment, confirm requirements with your local official before ordering parts.
Safety, codes, and a maintenance schedule
Ventilation is a safety system first and a comfort feature second. Carbon monoxide from burning fuel, fire from grease, and gas leaks are the three hazards a good setup keeps in check.
CPSC says outdoor cooking appliances must never be used indoors, in garages, or under enclosed structures that are not properly ventilated, and that grills belong at least 10 feet from homes and structures. That is guidance for freestanding grills; built-in kitchens follow the manufacturer’s clearances and local code instead.
Grease is the quiet culprit. NFPA says removing grease and fat buildup is one of the most effective ways to prevent outdoor kitchen fires, and that failing to clean contributes to gas grill fires. NFPA’s grilling safety tips add the basics: keep grills away from the home and overhangs, check gas tanks for leaks, keep children and pets well away, and never leave a grill unattended.
On codes, the chain of authority is simple. Manufacturer instructions set the baseline, model mechanical codes and NFPA 96 cover hood types and cleaning for commercial-style systems, and your local official decides what applies to your project. UL Solutions experts stress that compliance with local codes and the manufacturer’s instructions is paramount for commercial-grade equipment and outdoor kitchen enclosures.
A simple homeowner maintenance routine:
- After heavy use: clean hood filters and empty or wipe grease trays and drip pans.
- Before each season: check propane fittings and hoses for leaks (a soapy-water test works), and inspect vent openings for nests or debris.
- Monthly in peak season: look at the hood interior, fan blades, and exterior termination for grease film or blockage.
- When buildup appears: clean it right away rather than waiting for the next scheduled check.
- Periodically: schedule a professional inspection and duct cleaning, with intervals set by your hood manufacturer and local code.
Why we plan ventilation before the first stone is set
We build outdoor kitchens across Morris and Somerset Counties, and the same ventilation mistakes show up again and again. In our view, the single biggest one is treating ventilation as an add-on. By the time the cladding is up, adding vents or rerouting a duct means cutting finished stone, and the result rarely looks or performs as well as a planned system.
The other usual suspects are undersized ducts that choke a good fan, long runs with too many elbows, and builds that ignore the appliance documentation until the inspector asks for it. Weather deserves a place on that list too: wind, rain, and cold all affect how well a hood captures smoke, so exposed spots need wind protection and a rain-resistant termination.
Here is the checklist we walk through with homeowners:
- Verify the appliance installation documents for every unit in the layout.
- Plan the shortest, straightest duct path before framing starts.
- Size the hood and fan for capture, not just for looks.
- Place island vents correctly for propane or natural gas.
- Choose noncombustible materials near the cooking line.
- Schedule professional installation and inspection.
Settling these items early reduces cost, because nothing gets torn out, and improves safety, because the exhaust and venting are designed into the structure instead of squeezed in. Pairing the hood with finishes that match the rest of the patio is easier early too, and our outdoor kitchen project gallery shows how we integrate it.
— BG
Let us design and install your outdoor kitchen ventilation
We plan outdoor kitchens around the project’s ventilation needs. Because our team handles the design, masonry, and hardscaping together, ventilation is not an afterthought bolted on at the end.

Here is what we do for outdoor kitchen projects:
- Outdoor kitchen design and build, from layout to finished surfaces.
- Masonry and hardscaping coordination, so islands, patios, and cladding fit together.
- Site assessment covering clearances, overhead structures, and exposure to wind.
- Hood and duct placement planning around your appliances.
When we visit, we review your appliance documentation, walk the site, map a duct routing plan, and talk through hood and island venting options. You get a free estimate, with no pressure to commit.
Ready to plan ventilation into your outdoor kitchen from the start? Request a free estimate from Fernandez & Sons and tell us about your layout, appliances, and timeline. We serve homeowners in Morris and Somerset Counties, New Jersey, and we would be glad to walk your site with you. Our outdoor kitchen cost and permit guide is a good place to start budgeting before we talk.
FAQ
Do outdoor kitchens need a vent hood?
Not always, but a hood is recommended when you cook with grease-producing appliances under a cover or inside an island. Open-air setups may need only cabinet vents. Your appliance instructions and local building official have the final say.
How many CFM does an outdoor grill hood need?
Planning ranges run roughly 200 to 500 cfm for typical residential grills, with larger or commercial-style units needing more. Installed airflow matters more than the fan rating, and DOE analysis points to about 200 cfm as a meaningful capture threshold.
How should I vent an outdoor kitchen island?
Follow the grill manufacturer’s instructions first. Vent requirements vary by manufacturer and island design. Propane vents go low and natural gas vents go higher.
What kind of duct is best for outdoor kitchen exhaust?
Rigid metal or smooth-wall aluminum, run short and straight, is the best choice. DOE guidance calls for sealing joints with UL 181B or 181B-M materials. Avoid corrugated or flexible plastic duct.